Tuesday, December 24, 2013

DIY No Sew Felt Bow Ties

My nephew Armaan (big bro's son) turned 1 year old on 18 December 2013 and they had his birthday party on 22 December 2013. The theme for the party is Little Man. Sil contacted me and asked me where to find bow ties other than Daiso. Daiso is selling at RM5 per piece and she needs at least 30 pieces or more. I then told her I will sponsor the bow ties, whether I make them myself or purchase them. I then started to search online and found numerous sites on tutorials for bow ties. It got me excited because they looked so easy and it is something I can definitely do. There are two versions to make the bow ties, either to sew them or the no sew ones. I opted for the latter because hello, I ain't gonna sew!
I head over to Daiso and instead of buying handkerchiefs which are light, soft and thin, I found felt material and I thought it would be perfect. A packet consists of 5 pieces felt in different colours so I bought 2 packets. I do not have a glue gun so I bought a white glue, RM2.50 from Times Bookstore. I also bought a pair of scissors from Daiso. 
I started working on making the first bow ties. One piece of felt can yield 1 large and 2 small bow ties. 

I then started mixing the colours and made two-toned bow ties. Some are big and some are small. It really depends on how big or small you want your bow ties to be. I did not follow any measurements in the tutorials. I just used the directions as a basis. The first batch I made 19 pieces of bow ties.

I made a second trip to Daiso and bought two more packets of felt and a box of safety pins (40 pieces per box). This is the second batch of the bow ties. In total I managed to make 42 pieces colourful felt bow ties.

 I simply looped the safety pin at the back of the bow tie.

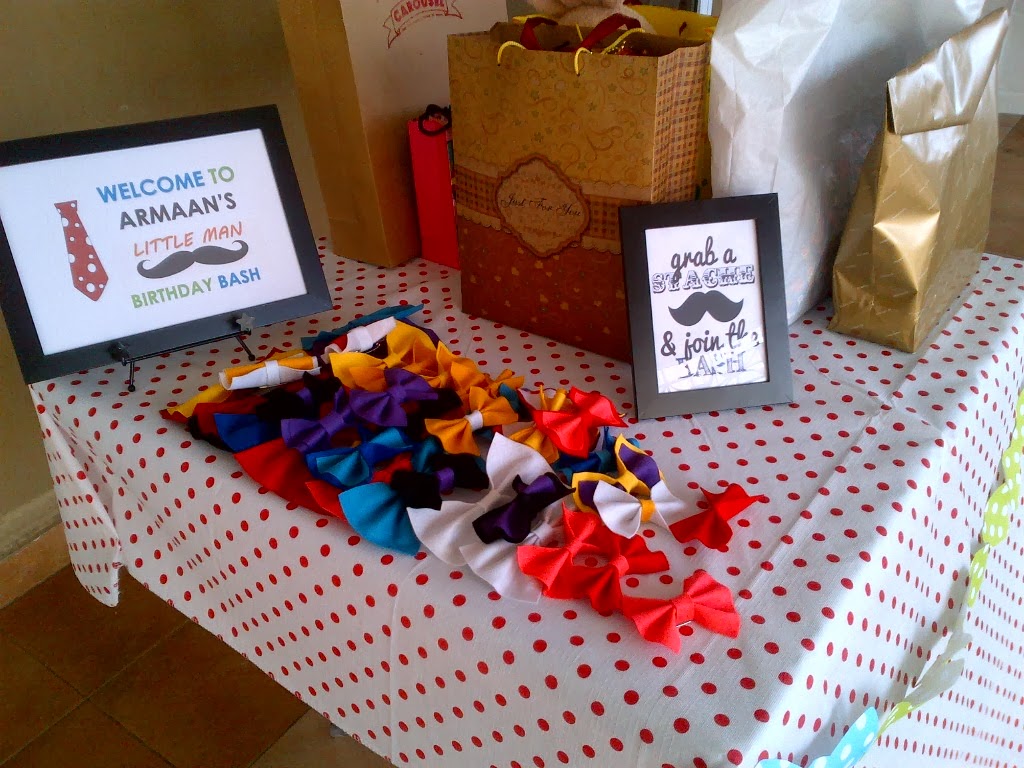
 The bow ties on the table at the party. Each guest can pick one and attach it to their top. It was so nice to see people wearing my handmade crafts. :)

 
I was going matchy matchy with Babycakes with our black tutu. Babycakes was wearing a white butterfly sleeved top with black lace and black polka dots while I wore an off white top with black hearts print. When I asked Babycakes to pick one bow tie, she picked a bright pink bow tie so I picked one myself too, but mine has two colours, red and bright pink.


Babycakes having fun with the props at the photo booth. She was so sporting and had so much fun taking pictures. :)

Some links for the tutorial, in case you're too lazy to google yourself.

http://www.stylemepretty.com/living/2011/05/30/diy-no-sew-bow-ties/

Monday, December 23, 2013

Review: Trendz Salon, Hilton PJ


I bought a deal from Groupon for a hair treatment package for RM45. I took leave on Friday just to have some me-time and I made an appointment at 11am. If you are buying or plan to buy a package like this, I would advise you to call the place beforehand and ask if the schedule time you intend to go is available. I called in to check if they are available on 21 December 2013 at 11 am. After I received the confirmation, then only I proceed to buy the Groupon. No point in buying the voucher only to find out the intended slot is already filled in. There are two options in package A, namely the hair protein package and the scalp treatment package.

The salon is located at Trendz Salon, Hilton PJ. Parking is RM5 for the first hour and RM5 for subsequent hours but maximum rate per day is RM15 so no matter how long you spend at the salon, it will still be RM15. A bit on the expensive side but then again it is a hotel. The salon is spacious and they also have a section for spa treatments.

I was contemplating between doing a hair protein treatment or scalp treatment. My hair is dry and damaged and it could really use some hair protein treatment but at the same time, my scalp is also itchy and very sensitive. In the end, I opted for the scalp treatment. This was before the treatment started and before I bid goodbye to my long hair.

The treatment started by applying some sort of liquid onto my scalp for 5 minutes to clean the scalp and rid of any flakes and build up. After that, off to hair wash and an application of another ointment all over the scalp. The hairstylist, Michelle applied the ointment all over my scalp and massaged my head for a while. I wished she massaged my head a bit more longer though because it felt so good especially with the cooling and tingling sensation from the ointment. She then wrapped my head and steamed it for about 15minutes before washing. Of course at the same time she promoted the scalp treatment to me and suggested that I do the treatment more often to see the results. She asked me to purchase 3 treatments for RM900. 0__o However I will get another 3 sessions for 'free', which means RM900 for 6 sessions / RM150 per session, which is slightly cheaper than outside.


The good thing is, the package comes together with a cut, wash and blow. You know how sometimes salons 'trick' you by promoting a certain deal for XX price, but if you want to cut, wash and blow, you have to pay an additional sum? That is why you must know what you purchased/signed up for so as not to fall victim to such tricks. I decided to chop off a significant amount of my hair because my hair is just too hard to manage and my hair falls a lot. I decided to opt for shoulder length. Before Michelle blew my hair, she applied another tonic/serum on my scalp. It stings for a while then it cools down. In case you are wondering, I did not purchase the treatment as suggested simply because I don't want to fork out RM900 in one go. I've got better things to do with such amount of money. Besides, location-wise is not that strategic for me because it is all the way in PJ. There are a lot other salons nearby and I might just check them out.

Monday, December 16, 2013

weekend project part 35


I present to you my butter cake with strawberry jam swirl which I made over the weekend. I was excited to try out the heart shape silicon mould I bought at IKEA. It was only RM25 and the size is perfect. While Babycakes and hubby were napping on Saturday afternoon, I baked this cake.

 
 I used the recipe from the Victoria Sponge Cake which I learned earlier, which was basically a spongy, fluffy butter cake. I don't have enough butter to make the cream so I decided to finish up the strawberry jam in my fridge and swirled it inside the batter just before I bake. I wanted to finish the jam which was already at the bottom of the bottle because I can't wait to open my new Bonne Maman raspberry jam I bought at the Food Bazaar at Publika. When using a silicon mould, especially ones with nooks and cranny, you must make sure the mould is greased evenly to ensure easy cake release.

The mould has some dots on it and when the cake is baked, I turned it over and it came out perfect. Clearly I did not swirl the jam properly, thus the random spots on the cake. The cake was delicious, fluffy and moist and when Babycakes and hubby woke up, I presented it to them and we sang a Happy Birthday song for my hubby, minus the candles. His birthday was actually on 9 December and I didn't bake a cake for him because we went out to dinner so this was my birthday cake for him, made with love. :)

Thursday, December 12, 2013

Avent Feeding Set

Remember this post? Today I finally received the gifts.


Babycakes already has her feeding set so I am going to keep these for future use, Insyaallah.

Monday, December 02, 2013

Breakfast Treat for Babycakes

Getting a toddler to eat is a pretty tricky task. Alhamdulillah Babycakes is not really a picky eater except when it comes to certain vegetables. She loves to eat so it isn't really hard to get her to eat. However, she has her good days and bad days. Sometimes I would make her a cheese sandwich using a Mickey Mouse cookie cutter and she would either just eat the cheese or eat Mickey's ears. Sometimes she would just drink the milk from the cereal and sometimes she would ask for a second helping of a half-boiled egg.
Last Saturday, instead of making the usual french toast, I decided to tweak the recipe a bit and instead of frying, I baked some egg toast for her.


 I cut 2 slices of bread into 4 small squares and put them in muffin tin greased with butter. Yeah, I didn't bother to cut the crusts off because it'll be such a waste. Besides, I don't want Babycakes to grow up not eating the crusts. I mean, I (had to) eat them when I was a kid so now I don't mind eating them.

I cut a few pieces of chicken pepperoni and mixed them with 2 eggs, a tsp of mayonnaise and salt and pepper to taste.
 I poured the egg mixture onto the bread and put a some cheddar cheese on top of it.

 I baked them until they are golden brown.

 Cool before serving to your little one. I cut the egg toast into small pieces so it is easier for Babycakes to eat.

There you go. Simple and hearty breakfast treat for my Babycakes (and her Cat). I would have put some chopped onions but Babycakes won't like it. You can always add some mixed vegetables, mushrooms or anything that you like. I don't want to open a can of button mushroom only to use a few pieces so this will do. Be sure to watch the salt that you put in because the chicken pepperoni and cheese have enough cheese.

Tuesday, November 26, 2013

Minimalist Apple Pie


Why do I call it a minimalist apple pie? Well simply because I used ready made frozen puff pastry instead of making the pie crust myself.


I have a few pieces of frozen puff pastry and apples so I decided to use them up to make an apple pie over the weekend.

 
This apple cutter is a life saver and whoever invented it is a genius. It makes cutting apples so much easier and faster and hassle free. I got mine at some sundry shop. Daiso might have them too. Go get one and you'll never cut apples the same way again.

Dice the apples and saute in butter. Add sugar and cinnamon powder and stir until apples are soft and tender. Prepare your pie dish or pan. I used a small heart-shaped pan and simply put the puff pastry in it. Make sure you poke holes on the pastry to prevent it from puffing up when baked. Add your caramelized apples.

Cover the pie with another piece of puff pastry. I skewered the top of the pie so that the pie crust will brown nicely and the apple filling can 'breathe'.

 Once the pie is baked to golden brown, take it out of the tin and serve with vanilla ice cream.

Here are 8 ideas for using frozen puff pastry. Give them a try!

Friday, November 22, 2013

Spicy Spaghetti Olio with Cili Padi and Ikan Bilis

I love simple, easy to cook dinners for the obvious reasons. When I cook rice, it usually comes with at least 2 types of dishes; a vegetable dish and a protein dish eg chicken or fish. Sometimes I would fry meehoon (vermicelli rice noodles) but our favourite and must have item in the kitchen has got to be spaghetti and pasta. Any type of pasta will do. Apart from the usual bolognese sauce, another of our favorite is spicy spaghetti olio with cili padi or cili kering and ikan bilis. It is hubby's favourite and he was the one who showed me how to cook it. It is very simple, the ingredients are minimal and very easy to cook.

Ingredients:
  • 1 red onion, sliced. I prefer to use a big onion because it is so much easy to peel as compared to shallots. They're tiny and annoying to peel.
  • A few garlic, crushed and chopped.
  • Cili padi, thinly sliced. If you don't have cili padi, you can use cili kering as well. The amount depends on how hot you want your spaghetti to be.
  • A handful of ikan bilis, washed and chopped. You can also leave the ikan bilis whole but I like to chop them up into small pieces so I get a piece in every bite. We have some tulang ikan masin so I just added them a bit to give that extra flavour.
  • Spaghetti, cooked as per instructions.
  • Olive oil
  • Salt and pepper to taste
The method is simple. Fry the onion, garlic, ikan bilis and cili padi until fragrant, add salt and pepper and then stir in the cooked spaghetti. Stir thoroughly and you are done. Sprinkle some parmesan cheese before you eat. 
Since this dish is spicy, Babycakes had bolognese pasta. Whenever I cook bolognese sauce, I would cook extra and freeze some for her in small portions. This comes in handy during the nights when she can't eat what we're having. She is also picky in her vegetables so I pureed some mixed vege (boiled, of course) and froze them too. I added the puree into her bolognese sauce and she didn't even know it. WIN!

Thursday, November 21, 2013

Nestle Cerelac The Triple Goodness Moment

A while ago I entered a contest on fb. This contest was held by Nestle Cerelac. There are three categories namely Mr and Ms Strong Bone Sweet Smile, The Immunity Supercuties and The Little Adventurers. You have to upload a picture of your kid according to the category and there are certain requirements you have to fulfill. For example, for Mr and Ms Strong Bone Sweet Smile, the picture must be a picture of your little one smiling away or showing that your little one is doing something that requires him/her to use his/her strong bones e.g. lifting blocks or pushing a cart.
For the second category, The Immunity Supercuties, your have to upload a picture of your little one that shows he/she has a strong immunity and must show his/her tummy. I entered the first two categories only because I had forgotten about the third category. 
Yesterday I received an email from Cereal saying that I have won the consolation prize. Alhamdulillah. I won a branded feeding set worth RM250. I wish I had won the grand prize but no prize is too small for me.I will upload the picture of the prize when I receive it, Insyaallah.

Wednesday, November 20, 2013

awesome deals are awesome

Recently I bought not one but two deals on Groupon for 3 regular pizzas from Pizza Hut for RM37. I think the deal is so worth it. However, it can only be redeemed on weekdays and you cannot choose the supreme pizzas and you cannot add on to stuffed crust and the like. As much as I love stuffed crust pizza, I had to make do with the offer. So on Monday night hubby went and redeemed the 3 pizzas namely Cheesy Delight, Beef Pepperoni and Spicy Tuna. The pizzas were good and the crusts were soft and fluffy! Such a good deal! I even tapau for lunch the next day.
And today I saw on Groupon this deal for 12 Soy Pancakes at Mr. Bean for RM19. I am so tempted to buy. Has anyone tried the pancakes? Are they good? Good thing is the redemption period is until 22 January 2014 so there's plenty of time.
Also I am tempted to buy this deal on Livingsocial. Who would have thought that Delicious would also promote their restaurant in these kind of websites? But I think the deal is worth it and it would be nice to try out the new Delicious outlet at St Mary Place.
I always buy deals for meals, photobooks and sometimes items but I hardly buy services like spa, hair treatment etc because some people say that they do shoddy jobs because you paid so low. I have however bought a deal to dye my hair at one of the hair salons in Solaris Month Kiara for only RM100. 
Speaking of photobooks, check out Groupon's offer. They're giving a 6" x 6" photobook for free! I am not kidding!


Friday, November 15, 2013

Trying To Be Healthy

If you have been reading my blog, you would know by now that I have sweet tooth. I just love anything and everything sweet and my favorite course of a meal is definitely dessert. When I go to buffets, I would check out the dessert table first and I would save space in my tummy for desserts.
I also love baking sweet treats than savoury treats. All those sugar intake is not good, I know. And it doesn't help that I don't exercise at all! *GASP* Except from walking in court, walking around the shops near my office during lunch, climbing up the stairs to my office on 1st floor (except when I have heavy files or my huge briefcase with me), doing house works etc.  I am also parking my car very much further from my office now. I used to park in the parking lot right smack in front of my office but getting out in the evening also raises my blood pressure because pub-goers would double park in front of my car and I would have to honk for several minutes before they come out to move their car. It is annoying! I know at the rate I am eating, I should do more intense workout. -_- Anyway, I do try to eat healthily whenever possible.

For a start, I have started taking organic raw cane sugar. I am a member of Cosway and there is one outlet near my office so it is very convenient. The price is much higher than normal sugar but at least it is slightly healthier. This pack of 900g is RM6.80. At least at home I take this sugar because when I eat outside, they use normal sugar.
I
I love to order green tea every time I eat at a Japanese restaurant but I never got into the habit of drinking it on a regular basis until recently. We all know that green tea has tons of benefits so it should become a daily drink. This is also from Cosway and it is also organic. This box contains 20 sachets and it is only RM6.90. 

Drinking tons of water is vital for your health. Everyday at the office I would drink a minimum 2 bottles of plain water. That doesn't include the drink I took at lunch (if I am eating outside), coffee in the morning, coffee in the evening and the drink at dinnertime, drink before bedtime etc. This water bottle is 1.2litres so I would finish one bottle before 1pm and then refill and finish it by 6pm. I drink so much water that I run to the toilet every 30minutes or so. This is  why I hate/can't wear a corset or a girdle because taking them off is such a hassle! Whenever we have lemons at home, I would put a few slices in my bottle and guzzle away. I bought this water bottle at Daiso and bought one for hubby and I made him drink a bottle too but of course he misplaced the bottle. He also lost my other water bottle. Sheesh. How can you lose or misplace such a huge water bottle?? Grrrrr.
Anyway, I just hope he drinks enough water. I mean, I can't monitor him but I would put a glass of plain water on the table together with his coffee in the morning. I can do whatever I can but it is up to him, really.
Sayang, I know you are reading this. I love you!

Friday, November 08, 2013

Improve and Learn

My passion for baking has increased tremendously lately. However I haven't reached the level of accepting orders yet because I haven't reached that confidence just yet. When people order from you, they have a certain expectation from you and I am scared that I am not able to meet their expectation. It is different when you bake simply and give people to eat because people didn't expect anything. When people pay you to do something, they expect it to be good. I am still learning so when my sister asked if I wanted to join a baking class which her friend conducts, I said, why not? How can you say no to gaining knowledge, right? And what better way to improve yourself if not through learning from an expert? 
So on Maal Hijrah, we went to my sis's friend's house to learn baking congo bars, brownies and victoria sponge.

 This brownies recipe is amazing, very rich, moist, chewy, decadent and chocolatey!

Congo bars is a rich fudgey cake with rich chocolate and so sinful especially when eaten warm when the chocolates are melted.
Victoria sponge is a 3 layer vanilla sponge cake (of course you can make it 2 layers if you like) with cream and strawberry jam filling. This cake is so spongy, moist and the combination of strawberry jam and cream makes it fresh and uplifting and not too rich. This type of cake is perfect for tea. However make sure the cream and strawberry jam are not too sweet.

We attended the class together with three other ladies, all baking enthusiasts. This is a pic of us with the stuffs that we learned that day.
Now, who wants to order from me? hehehe.

Monday, November 04, 2013

weekend project part 34

This is my second attempt at making cinnamon rolls. The first time I tried, the yeast didn't work so my dough didn't rise as it should. When I baked, the end product was a rock hard bread which ended up in the dustbin. But that did not deter me from making it again. This time I used a different recipe. Some people find working with yeast intimidating but as long as you follow the recipe religiously, Insyaallah it will turn out great. Recipe is from Sallys Baking Addiction.

Making cinnamon rolls is actually quite easy. The only thing is, you have to rest the dough for it to rise and double in size. See the before and after picture above. After an hour, the dough fluffed up and rise and filled the gaps. I should have not put all dough in one tin because I am sure they would fluff up more given the room. My rolls ended up squished against each other lol. You know your rolls will turn out fine when you see that it has doubled in size.


After baking for about 25 minutes, this is how they look like. I put a light glaze on them because I don't want them to be too sweet.

You can see how fluffy the rolls are. My family loved it! This recipe is definitely a keeper. Next time I will try put some nuts, raising and chocolate chips.

Wednesday, October 23, 2013

Danish Pastry and Croissant Baking Workshop

I must admit that I'm a sucker for good deals. Today, there are just too many deal websites available. I am not sure if all are reliable but so far I have bought deals from Groupon, MyDeal, milkadeal, Livingsocial, and maybe a few others which I can't remember. But the above are my top deal websites which I normally browse and find good and interesting deals.
One time I bought a deal from Groupon for a danish pastry and croissant baking workshop. It was RM99. I went to the workshop on Saturday, 12 October 2013. The workshop was held at Millenium Square, PJ.

This was where the workshop was held. I arrived 15 minutes late because I couldn't find the place., or rather my GPS couldn't find the place. -___- And also because I had to stop at McDonald's to do my big business. -__- So I missed the first, most important part of the class, which is making the dough. Sigh such a waste.

Anyway, they gave us a sheet of paper with the recipe on it and they  also wrote it on the board so I didn't really lose much. It looks easy in writing but it is actually a tedious and quite a tiring process. We were also taught how to make the cream filling for the pastries. I didn't take pics because I was bust concentrating. Cewah.
The dough needs to be rested in the fridge after mixing. This is the part where the pastry fat or butter is added and kneaded. This is the hardest and most tiring part because you need to roll out the pastry to distribute the pastry fat or butter evenly. There is also the several folding methods to ensure that when the pastry is baked, you get the flakiness and layers of buttery goodness. Too much of kneading and rolling will cause the pastry to lose its layers.

We were taught to shape the croissants, to make the pinwheel shape, diamond shape, bear paw shape and square shape. There is a certain measurement that you have to follow to get the right size. Told ya it's not easy! And I really don't like the measuring parts. We actually used a measuring tape and a ruler to get the exact measurements!

These are my pastries before baking. You can either put the fruits and cream before or after baking. I also brought some unbaked pastries home to bake the next day. You can make the dough and freeze them in the freezer for several months.

The girl in the black apron was our teacher that day. She was assisted by her sister. They're both very young and friendly girls. Obviously she knows what she's doing and we were in awe every time she demonstrated to us. There are a few couples attending the workshop as well, which I think is very sweet. Next time I might drag my hubby along but he said if it's a cooking class, he's all for it but for baking, no way. -__- So much for enthusiasm huh?
This is the second hardest part actually. Not the baking part but the waiting part! The whole room smells like a bakery and the smell was so good! By the time we finished baking, it was past 12pm and everybody was starting to feel hungry. Class started at 930am by the way.

These were my baked goodies. Don't they look awesome and professional? Heh heh. Most importantly, hubby and Babycakes said sedapppppp! :) If you are too lazy to make the dough from scratch, fret not. You can just buy the frozen puff pastry in the supermarket and shape them as you please. I think I might just do that because it's just too much work! Now I know why a piece of danish pastry or croissant costs RM3 onwards! However if you make your own, you will use the finest ingredients like butter instead of pastry fat and you can use any and as much filling as you please.
Who knows, I might set up my own little cafe with cakes and pastries when I am done or bored with practicing as a lawyer. At least I have a back up, right? And it's something that I like to do. Next time I want to see if there are any bread or bun making workshops.
Checkout their fb at The Studio Kitchen if you are interested in joining their classes. They also offer a diploma course for 1 year at RM9999.

Tuesday, October 22, 2013

weekend project part 33

I was feeling a little ambitious and extra hardworking on Friday evening. I wanted to make a cake to bring to my aunt's house on Saturday afternoon. Instead of the normal butter cake or chocolate cake, I decided to give rainbow cake a try. I know it's just butter cake with food colouring. I got the recipe for butter cake from bestrecipes.com.au. http://www.bestrecipes.com.au/recipe/easy-mix-butter-cake-L497.html

Since I am making a rainbow cake, I doubled the measurements and I got quite a large batter. I then divided the batter into five because I have five food colourings i.e. red, orange, yellow, green and blue. I didn't have purple and I totally forgot that red+blue=purple.
Baking each colour takes about 15-18mins because the layer is thin. However since I don't have two baking tins of the exact same size, it takes quite a while because once one layer is done, I have to transfer it on a cooling rack, replace the baking sheet, pour the next batter and bake again. My oven isn't big enough to hold two tins at a time anyway. The baking part was really long. I let the cakes to cool down overnight and I put the baking sheet in between the layers so they don't stick. I then covered with a cling wrap. The next day, I asked hubby to buy butter to make the buttercream frosting.
Frosting the cake is quite a challenge for me. One, my icing is a bit too sweet. Two, the texture and consistency of my icing isn't smooth so I ended up with sort of a 'rustic' look on my cake, or so I would like to believe. While I was frosting my cake, hubby took Babycakes to swim in the pool so I get to work in peace because the previous night Babycakes keep peeping at my cake and said 'Nak! Nak!' and I know she was just too intrigued by the colours of the cake. I'll have to wait for her to be slightly bigger before I can get her involved in my baking projects or I'll end up with a very messy kitchen and toddler.

I sprinkled the top of the cake with colourful strands to give a hint that it's a rainbow cake. I brought it over to my aunt's house and I was just in awe when I cut the cake. Just look at how vibrant the colours turn out. I am amazed at myself! :) You can clearly see that the sizes of the layers are uneven and the frosting too is uneven but heck, it was my first time and I couldn't be more happier for myself. I need to learn how to make a nice frosting which is less sweet and easy to spread. Next time I must remember to make the colour purple.