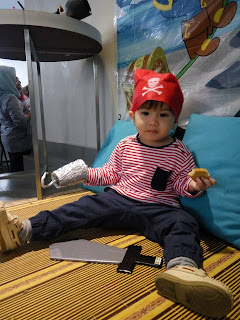
We received an invitation to a pirate-themed birthday party on the eve of Christmas Day. Since I was still in the mood of doing DIY stuffs and dressing the kids up, I decided to purchase some pirate stuffs online (for less than RM50) which consist of:
- 2 bandanas
- 1 pirate cap
- 1 set of eye patch and earring
- 1 set of bandana+eye patch+earring
However, a pirate costume is not complete without a sword and a hook so as usual, Pinterest came to my rescue.
I used a cardboard box that was lying around in the house and started drawing the shape of the sword. Then I traced the same pattern on another piece of cardboard. This is Babypie's sword.
For Babycakes, I decided to make a different shaped sword, just because. However, when I was cutting the cardboard, I kinda regretted doing this shape as cutting it was more difficult than cutting straight lines like the first sword. I did the same for this sword whereby I drew, cut and trace.
You will end up with two pieces of the swords. Actually it is OK to only have one piece but I want the sword to be sturdy therefore I cut two pieces of each and glued them together using white glue. You can use any type of glue.
Initially I thought of getting the kids to use watercolour to colour their swords but the swords won't be firm and sturdy so what I did was, I bought some black pvc tape and covered the hilt (handle) of the sword with it. As for the blade, I used aluminium foil to cover. However, the foil doesn't stick well and it is easily torn. Thinking that since the kids may play with the swords roughly, the cardboard may not be able to withstand the force. So I scrapped the foil idea.
I went to Daiso and bought this silver cloth tape which is perfect for the sword.
I simply wrapped the swords with the tape. Due to the shapes of the swords, clearly you can see that the tape was overlapping one another but in the end, all parts of the cardboard was covered with tape and they were firm and sturdy. They sure looked like real pirate swords, don't you think?
Once the swords were done, I started working on making the hooks. There are so many tutorials available and I found this one the easiest. All you need is paper cups or plastic cups, a pair of scissors and aluminium foil.
Cut the foil and cover the whole cup with the foil. Simply fold in the remaining of the foil into the cup. I didn't even use any tape to make the foil stick to the cups. Take another sheet of foil and roll them up tightly and shape them into a hook shape. Then, cut a hole at the bottom of the cup and insert the hook. To make the hook stay in place, I used some silver cloth tape.
These are the end products. I put the kids' name label on the hilt of the swords so that they don't fight over which one belongs to whom.
On the day of the party, my kids were all dressed up in their pirate costumes. Babypie was wearing a red and white stripe long sleeve shirt which has elbow patches and a cute little pocket with dark blue pants while Babycakes simply wore a T-shirt with a picture of a tiger wearing a pirate hat and grey pants. Their T-shirts are from H&M. Both of them also wore the bandana and Babycakes was wearing an eye patch and also a hoop earring. Babypie refused to wear the eye patch though.
Ready for some swash-bucklin' actions!
Babycakes trying to look mean like a pirate. Arrr!
Babypie showing off his sword and the hook that Mummy made.
A pirate needs a break too!
Here is one picture with the birthday boy, their cousin Armaan who turned 4 on 18.12.2016. The party was a joint celebration with Armaan's other cousins Asadel (3), Aariz and Adelia (twins,1). Babycakes and Babypie sure had fun and looked the part and Mummy had fun dressing them up for sure.
As for me, I simply wore a striped top and tied a bandana around my neck. Before that, I wore the bandana. Seen here in this pic, I was wearing a pirate cap whereass for Hubby, the beard and the pirate hat were party props prepared by the organizer. Initially Hubby wore the pirate cap that I had on. Dressing up for themed parties are fun but they don't need to cost a bomb. You just need to be more efficient and put in a little bit more effort to DIY.


No comments:
Post a Comment